


Too many famous bootable USB-creating software is not helping you to create a bootable USB of Windows XP.
So today in this article we are going to show you how you can create a bootable USB of Windows XP with just one click.
So in this article, we are using two software, with any one of these software you can create a bootable USB of Windows XP easily.
So in this article, we are using two software, with any one of these software you can create a bootable USB of Windows XP easily.
The first software is Win32diskmanager and the other one is Rufus. You can download both of them from the links below:-
So after downloading both software follow the steps below to create a bootable USB of Windows XP.
1) First of all you must have the ISO file of Windows XP, if you don't have a Windows XP ISO file then you can download it from here click here to download Windows XP
2) Now after that open the software Rufus.
3) Now insert your USB and click on the disc icon and select the ISO of Windows XP.

4) Now after selecting the ISO click on the start button to start creating a bootable USB.

5) Wait for the process to complete, after it's complete then boot your PC with USB and then you can see the Windows XP installation screen.
So this is the way to create a bootable USB of Windows XP using Rufus, if the Rufus method didn't work then follow the second method below which will work with all Windows XP ISO.
Creating a bootable USB using win32diskmanager is easier than Rufus.
So after downloading both software follow the steps below to create a bootable USB of Windows XP.
Method 1 Using Rufus
1) First of all you must have the ISO file of Windows XP, if you don't have a Windows XP ISO file then you can download it from here click here to download Windows XP
2) Now after that open the software Rufus.
3) Now insert your USB and click on the disc icon and select the ISO of Windows XP.

4) Now after selecting the ISO click on the start button to start creating a bootable USB.

5) Wait for the process to complete, after it's complete then boot your PC with USB and then you can see the Windows XP installation screen.
So this is the way to create a bootable USB of Windows XP using Rufus, if the Rufus method didn't work then follow the second method below which will work with all Windows XP ISO.
Mehtod 2 Using Win32diskmanger
Creating a bootable USB using win32diskmanager is easier than Rufus.
But when you create a bootable USB using Rufus then your USB is still usable but when you create a bootable USB using win32diskmanger your USB will be converted into the parts and won't be usable.
So after creating a bootable USB with win32diskmanager, install the windows and then format your USB using computer management I will show you the process after that.
1) So first download win32diskmanger from the above link and install it, the installation method is simple as other software.
2) After installation, run win32diskmanger and insert your USB.
3) Now click on the folder icon and select the ISO file of your Windows XP, to select the Windows XP ISO file change the file type to *.* and then select the ISO.
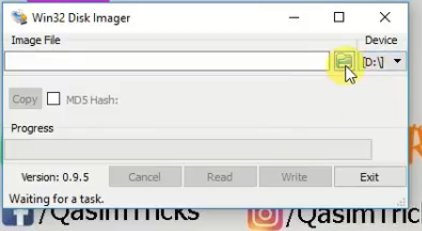

4) After selecting the ISO, click on the write button and then the process of creating a bootable USB will start.

5) Now wait for the process to complete, after it's complete restart your computer and boot it from your USB, and then you will see the installation screen of Windows XP.
So this is the way to create a bootable USB of Windows XP and after installing the Windows, format your USB using the computer management if you don't know how to format the USB using Computer Management then follow the method below.
1) So first open search and type " Computer Management " and then run Computer management.

2) Now click on the " disk management " on the left.

3) Now find your USB which should be in " RAW " format and then right-click on your USB and click on " delete partition ".

4) Now after partition delete, again right-click on the USB and click on " New Simple Volume ".

5) Now select the volume label and click next on all the wizards.

6) Now your USB has been formatted successfully.

So this is the way to format USB using computer management.
If you didn't understand the above article, then simply watch the video below of how to create a bootable USB of Windows XP:-
So this is the way to create a bootable USB of Windows XP.
1) So first download win32diskmanger from the above link and install it, the installation method is simple as other software.
2) After installation, run win32diskmanger and insert your USB.
3) Now click on the folder icon and select the ISO file of your Windows XP, to select the Windows XP ISO file change the file type to *.* and then select the ISO.


4) After selecting the ISO, click on the write button and then the process of creating a bootable USB will start.

5) Now wait for the process to complete, after it's complete restart your computer and boot it from your USB, and then you will see the installation screen of Windows XP.
So this is the way to create a bootable USB of Windows XP and after installing the Windows, format your USB using the computer management if you don't know how to format the USB using Computer Management then follow the method below.
Format USB using Computer Management
1) So first open search and type " Computer Management " and then run Computer management.

2) Now click on the " disk management " on the left.

3) Now find your USB which should be in " RAW " format and then right-click on your USB and click on " delete partition ".

4) Now after partition delete, again right-click on the USB and click on " New Simple Volume ".

5) Now select the volume label and click next on all the wizards.

6) Now your USB has been formatted successfully.

So this is the way to format USB using computer management.
If you didn't understand the above article, then simply watch the video below of how to create a bootable USB of Windows XP:-
So this is the way to create a bootable USB of Windows XP.
If you have any problem then you can ask in the comments section below, if you like this article then also share this with your friends on your social site.

