


How to increase the speed of the Internet on Windows 10
There are a few simple ways to fix your slow internet on Windows 10.
And we’ll show you step by step how you can do that within a few seconds. So follow all the steps below:-
Windows sends your internet bandwidth to be shared with complete strangers that you have never met in your life.
1. Close the Peer to Peer Update Process on Your Computer
Windows sends your internet bandwidth to be shared with complete strangers that you have never met in your life.
They do this without initial permission from you, and this sharing of the internet is meant for seeding (you’ll know how this works if you’re a torrent user) but we’ll explain to you anyway.
Basically seeding is kinda a way to help others get their Windows updates much faster but it comes at the price of your own internet.
I am not completely sure why Microsoft does this.
But it could be that they want both you and me, Windows users, to get our updates faster and stay up to date to prevent all kinds of bugs and malware from infecting the computer.
To disable it follow the below steps:-
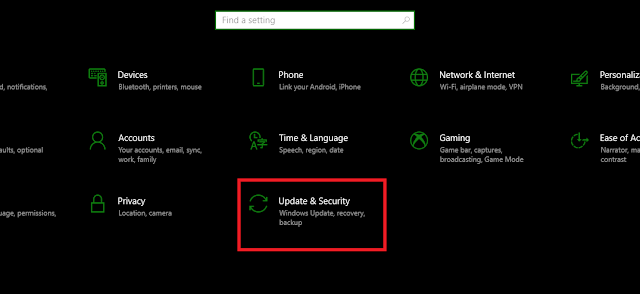
1) First of all open settings on your Windows and go to the Update and Security tab.
2) Now click on Advanced Options
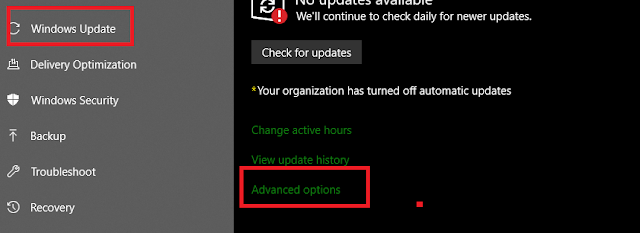
3) Now click on Delivery Optimization or ( Choose how updates are delivered in Windows 10 older version)
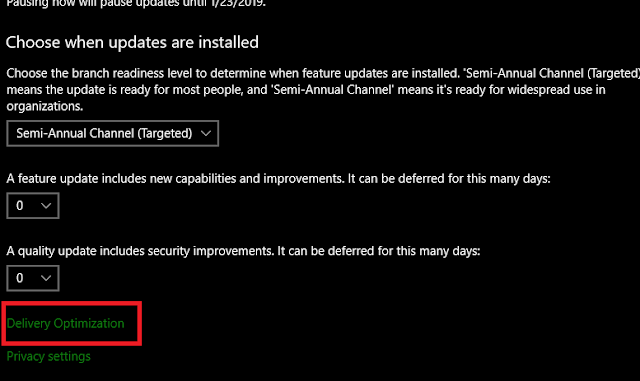
4) Finally, scroll down and turn off the on button.

Now you no longer need to send your own precious internet for complete strangers around you.
Quit all your background apps, and I can assure you, your internet will be much faster.
To disable it follow the below steps:-
1) First of all open settings on your Windows and go to the Update and Security tab.

2) Now click on Advanced Options

3) Now click on Delivery Optimization or ( Choose how updates are delivered in Windows 10 older version)

4) Finally, scroll down and turn off the on button.

Now you no longer need to send your own precious internet for complete strangers around you.
2. Quit your Background Apps
Quit all your background apps, and I can assure you, your internet will be much faster.
Some of the apps that take up a lot of your internet whilst it runs in the background include
Antivirus (Virus Database Update), Torrents app, steam, etc, so to find out which of your app is takes up most of your internet, then follow the steps below:-
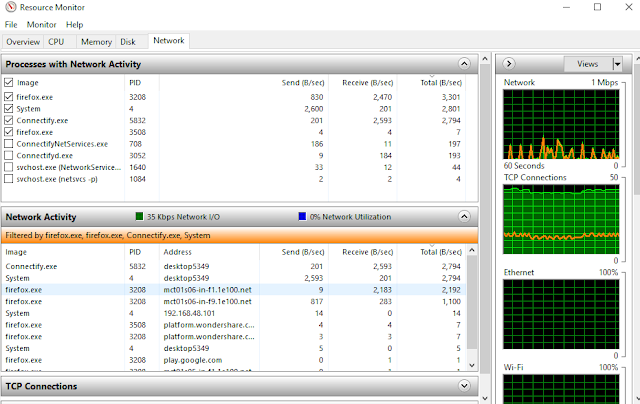
1) Start off by right-clicking the Windows Taskbar. Open Task Manager
2) Once you’re in your Task Manager’s menu, click on the Performance tab
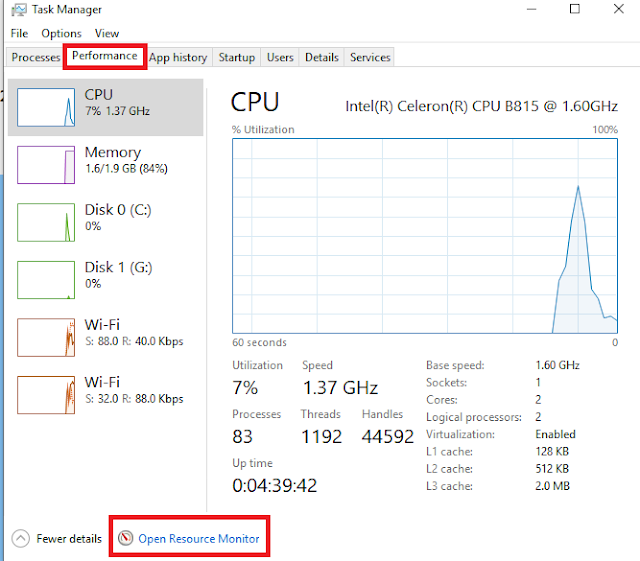
3) Now click on Open Resource Monitor from the bottom part of the window.
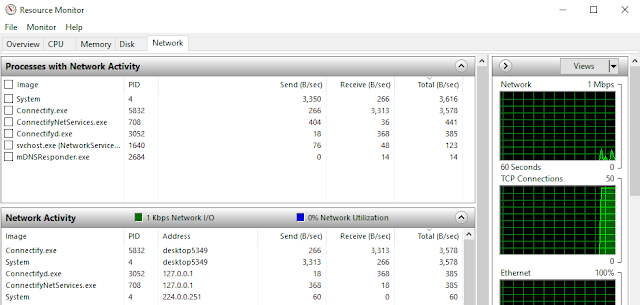
4) Lastly, click on the Network tab and check for all your apps or services that have a high number of send and receive requests.
Antivirus (Virus Database Update), Torrents app, steam, etc, so to find out which of your app is takes up most of your internet, then follow the steps below:-
1) Start off by right-clicking the Windows Taskbar. Open Task Manager
2) Once you’re in your Task Manager’s menu, click on the Performance tab

3) Now click on Open Resource Monitor from the bottom part of the window.

4) Lastly, click on the Network tab and check for all your apps or services that have a high number of send and receive requests.
The way it works is, the higher the number, it shows that these apps or services are taking a chunk of your internet bandwidth.
Since now you have an idea or sort of which of the apps or services that takes up most of your internet, you can now get onto disabling them.
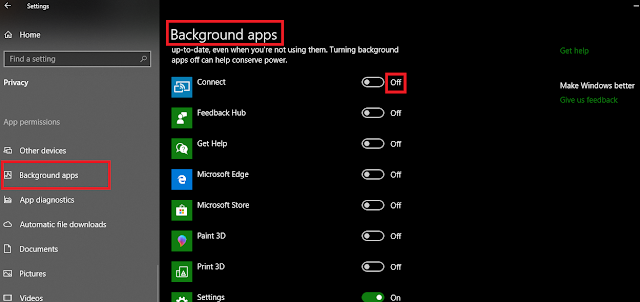
So open settings on your Windows and click on Privacy, and then Background apps.

Quitting your Apps
Since now you have an idea or sort of which of the apps or services that takes up most of your internet, you can now get onto disabling them.
So open settings on your Windows and click on Privacy, and then Background apps.
Here’s where you can turn Off the apps and services that feed off your internet.
The thing is, you don’t really have to disable it altogether, you can still manually ask it to send you notifications so that you can choose when you want to update your Windows 10.

3. Disable Windows Update
The thing is, you don’t really have to disable it altogether, you can still manually ask it to send you notifications so that you can choose when you want to update your Windows 10.
Here’s how can adjust the Windows Update settings to your comfort
1) Open Task Manager, go to the services tab and click on open services.
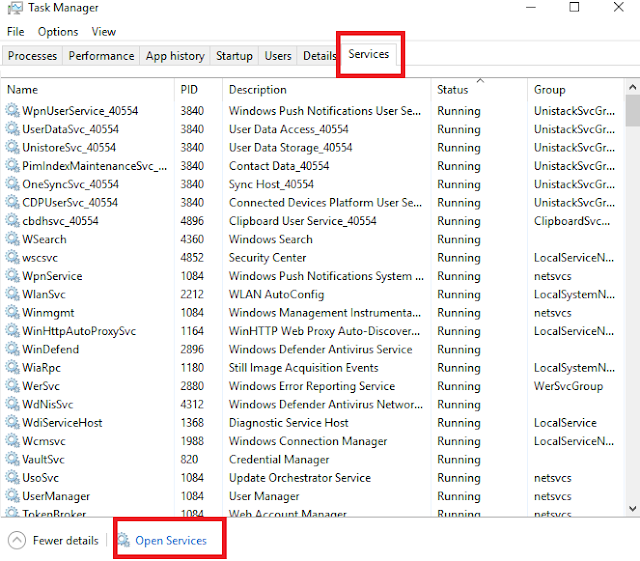
2) Now search for Windows Update here, right-click on it and then click on Properties.
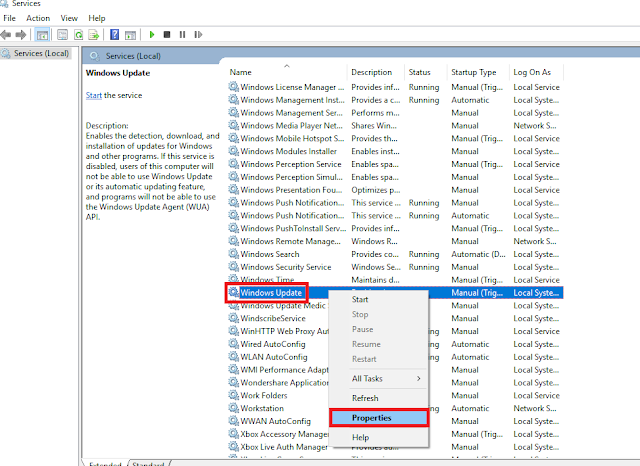
3) Now Click on the Stop button, Select disabled and click on ok.
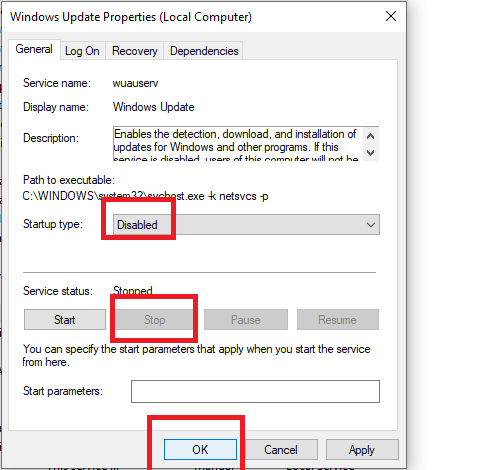
So now Windows Update has been turned off, but always keep your Windows Updated, you have to update it manually by go the settings > Update and security and then Check for updates.
It is actually a feature that you can find on Windows 10 that improves your computer’s performance for your programs by receiving TCP data (short for Transmission Control Protocol) over a network.
1) Open Task Manager, go to the services tab and click on open services.

2) Now search for Windows Update here, right-click on it and then click on Properties.

3) Now Click on the Stop button, Select disabled and click on ok.

So now Windows Update has been turned off, but always keep your Windows Updated, you have to update it manually by go the settings > Update and security and then Check for updates.
4. Disable Windows Auto-Tuning feature
It is actually a feature that you can find on Windows 10 that improves your computer’s performance for your programs by receiving TCP data (short for Transmission Control Protocol) over a network.
Think of it as a conversation that your programs are having between them, and in which they send small chunks of data with each other.
That’s TCP for you. It takes up a lot of your internet which then leads to your slow internet on Windows 10.
The way you can do that is just simply by turning off the button for the Windows Auto-Tuning feature, which by default is already turned on.
To disable it, follow the steps below:-
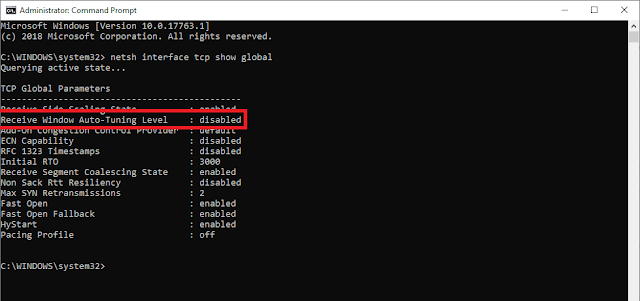
1) First of all open search on your Windows and type cmd, now right-click on Command Prompt, and run it as administrator.
2) Now type the command netsh interface tcp show global in the window.
3) Now you are going to check for Receive Window Auto-Tuning Level and if you find that it is set to normal, then you will need to disable it.
4) Finally, again type another command netsh int tcp set global autotuninglevel=disabled to disable it.
Now I have been hearing that AVG Firewall actually blocks your internet.
The way you can do that is just simply by turning off the button for the Windows Auto-Tuning feature, which by default is already turned on.
To disable it, follow the steps below:-
1) First of all open search on your Windows and type cmd, now right-click on Command Prompt, and run it as administrator.
2) Now type the command netsh interface tcp show global in the window.
3) Now you are going to check for Receive Window Auto-Tuning Level and if you find that it is set to normal, then you will need to disable it.
4) Finally, again type another command netsh int tcp set global autotuninglevel=disabled to disable it.

5. Disable Firewall
Now I have been hearing that AVG Firewall actually blocks your internet.
I don’t know if that’s true, but you can always check by disabling your firewall, and seeing whether your internet gets any faster or not.
Just go ahead onto your Start and type firewall in your search to see if you have any other firewall programs on your computer turned on.
Try disabling and re-enabling it to see whether your internet speed gets any better as this might be what’s causing a slow internet on Windows 10.
This is another one of the features that you might find on Windows 10.
Just go ahead onto your Start and type firewall in your search to see if you have any other firewall programs on your computer turned on.
Try disabling and re-enabling it to see whether your internet speed gets any better as this might be what’s causing a slow internet on Windows 10.
6. Disabling Large Send Offload (LSO)
This is another one of the features that you might find on Windows 10.
And again it is meant to improve your overall network performance of your system.
(It’s pretty similar to the Windows Auto-Tuning level feature that you just saw above), but it does come at a price.
Your LSO forces your background apps (which includes your Skype, Spotify, etc.) to use up a large amount of your internet whilst you’re doing something else on your computer.
To disable it, follow the steps below:-
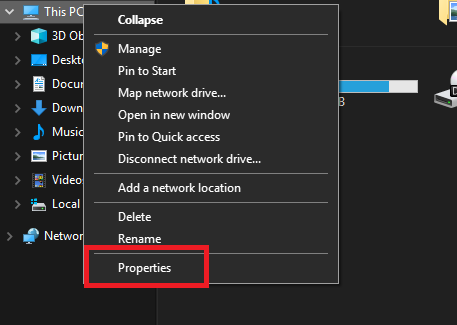
1) Right-click on This PC and then go to Properties.
2) Now click on Device Manager
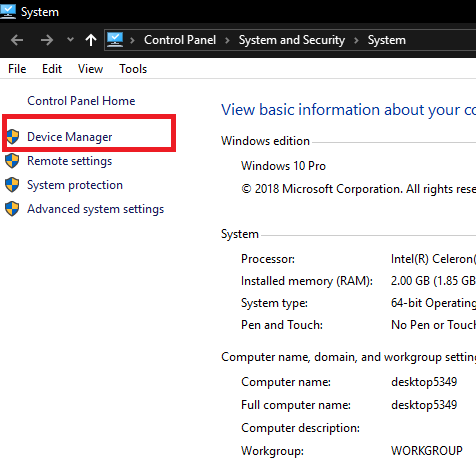
3) Here you will be able to see all your devices listed, but for now, you will only need to expand your Network Adapters.
4) Now find your network card and double click on it.
5) Now select the Advanced tab and then go ahead and select Large Send Offload V2 (IPv4). All you have to do here is set the value to Disabled.
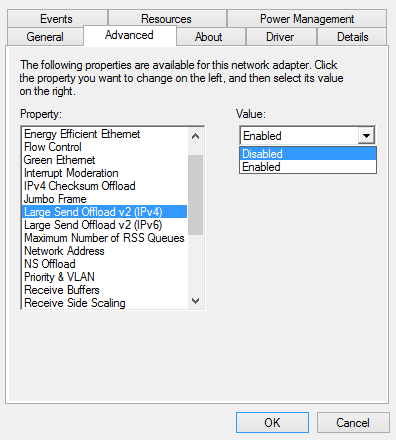
6) Do the exact same that you just did for Large Send Offload V2 (IPv6) (that is if, it is available).
7) Click OK and you’re done.
Sometimes whenever you upgrade to a new Windows, especially if you just upgraded to your new Windows 10, unwanted errors that have got to do with your drivers could now and then pop up.
Your LSO forces your background apps (which includes your Skype, Spotify, etc.) to use up a large amount of your internet whilst you’re doing something else on your computer.
To disable it, follow the steps below:-
1) Right-click on This PC and then go to Properties.

2) Now click on Device Manager

3) Here you will be able to see all your devices listed, but for now, you will only need to expand your Network Adapters.
4) Now find your network card and double click on it.
5) Now select the Advanced tab and then go ahead and select Large Send Offload V2 (IPv4). All you have to do here is set the value to Disabled.

6) Do the exact same that you just did for Large Send Offload V2 (IPv6) (that is if, it is available).
7) Click OK and you’re done.
7. Update Your Network Drivers
Sometimes whenever you upgrade to a new Windows, especially if you just upgraded to your new Windows 10, unwanted errors that have got to do with your drivers could now and then pop up.
The reason could be that your drivers are outdated, lost, or you just might have the wrong network drivers on your computer.
So it’s always good to check up on this (even if you’re not having any problems).
You can use is Driver Talent and you don’t need to do a thing as it matches your computer to the right drivers and it downloads them automatically in just two minutes, it's free.
Your Windows actually keeps away 20 percent of your Internet bandwidth just for its OS and other system-related stuff, since you only have the remaining 80 percent for you to use, you can actually get back that 20 percent for you to use.
To do that follow the steps below:-
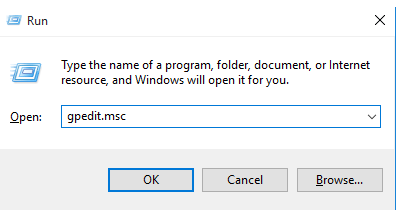
1) Press Windows+R on your keyboard to open the run.
2) Now type gpedit.MSC
3) Now you will find that the Group Policy window will come up, so what you have to do here is just click on Computer Configuration.
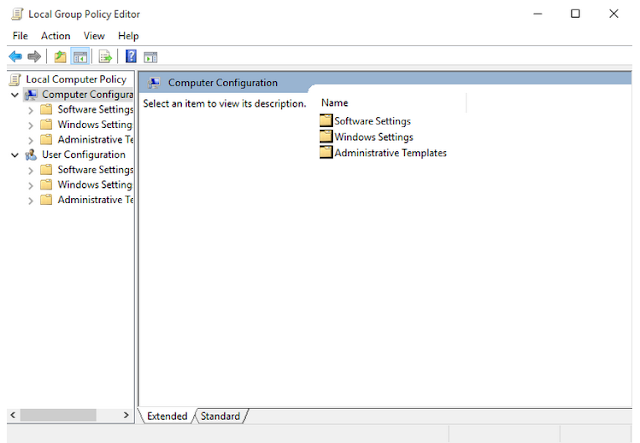
4) Next go to Administrative Templates, then Network, and lastly QoS Packet Scheduler.
You can use is Driver Talent and you don’t need to do a thing as it matches your computer to the right drivers and it downloads them automatically in just two minutes, it's free.
8. Adjust the Internet Bandwidth Settings
Your Windows actually keeps away 20 percent of your Internet bandwidth just for its OS and other system-related stuff, since you only have the remaining 80 percent for you to use, you can actually get back that 20 percent for you to use.
To do that follow the steps below:-
1) Press Windows+R on your keyboard to open the run.
2) Now type gpedit.MSC

3) Now you will find that the Group Policy window will come up, so what you have to do here is just click on Computer Configuration.

4) Next go to Administrative Templates, then Network, and lastly QoS Packet Scheduler.
Once you’re here click on Limit reservable bandwidth.
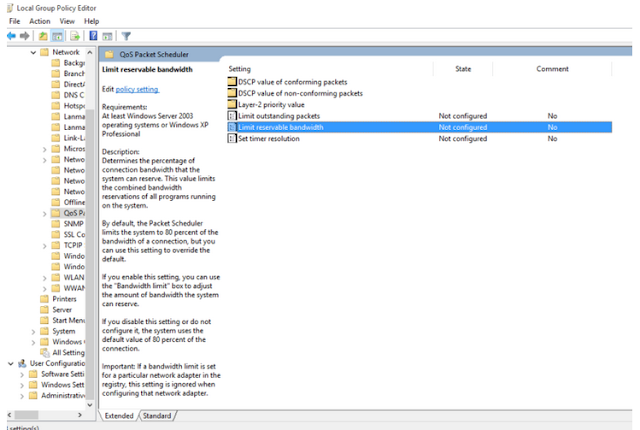
5) Now in the new window that comes up, all you have to do is just two things.

5) Now in the new window that comes up, all you have to do is just two things.
First, choose Enabled and then change the Bandwidth limit (%) from 100 to 0.
6) Make sure that you Apply these new changes that you just made and then click on OK.
So these are the 8 best ways to speed up the internet speed in Windows 10.

6) Make sure that you Apply these new changes that you just made and then click on OK.
So these are the 8 best ways to speed up the internet speed in Windows 10.
If you have any questions then you can ask in the comments section below.
If you like this trick then also share it with your friends, keep visiting Qasim Tricks for more content like this.

